This post will teach you how to sell clothes on Poshmark.
Last summer during quarantine, I started selling my clothes on Poshmark and quickly became obsessed!
When I came home from college, I had a lot of old clothes that either did not fit me anymore or just weren’t my style. I usually donate my old clothes, but with many of those being closed during the pandemic, I began looking for another option.
Poshmark is awesome for college students because it provides you with an easy and fun way to make money! Being a college student, I can always use some extra spending money.
For those of you not familiar with Poshmark, it’s an online consignment app that allows thousands of users to buy and sell second-hand and brand new clothing, shoes, accessories, and beauty products. You can always find great prices and negotiate with the seller as well.
While thrift stores get tons of donations every day, most everything that doesn’t sell ends up in a landfill. There is so much apparel and textile waste in our world. Poshmark takes care of that problem by providing a sustainable, ethical, and eco-friendly way to give your clothes a new home!
Below you’ll find a beginner’s ten-step guide on how to use Poshmark, as well as some tips and tricks along the way, like how to gain more followers and make more money!
Related reading: The Best Places to Sell Your Designer Shoes
Table of Contents
Step 1: Photos
The first step for selling on Poshmark is always to take good photos for your listing. They allow you to add up to 17 photos to the listing, 1 of them being your cover photo.
Your cover photo is the most important photo because it’s what attracts the customer to click on your post. Make sure you have good lighting, a good background, and a clear and high-quality image.
Make sure all the other photos capture each angle of your item. I also like to take pictures of any tags and close-ups of details, zippers, and pockets.
After selecting the images, you can crop them and make adjustments through the app; like the brightness, contrast, vibrance, and sharpness. Poshmark also offers in-app filters you can apply to the photos to make them look more aesthetically pleasing to the eye.
Step 2: Title
Next, add the listing’s title. You get 50 characters to catch someone’s attention. It’s important to try to be as descriptive as possible in the title.
When it comes to the title, there is an easy formula to follow to make sure your listing comes up in searches, both on the app and on Google.
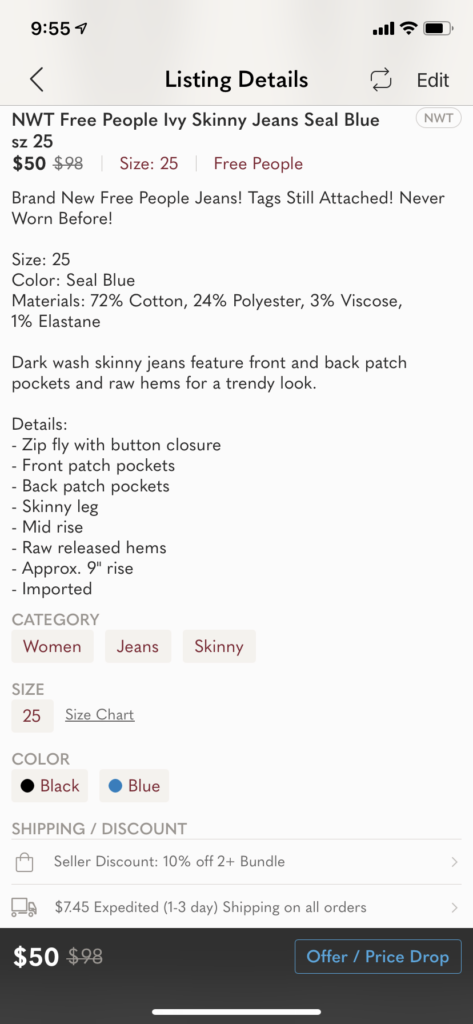
- NWT or NWOT + Brand + Item Name + Item Style + Color + Size
NWT means new with tags, meaning the item is brand new with tags attached and has never been worn before. Putting this in the title will make your item more popular.
Same with putting NWOT, which means new without tags. This is a brand new item that has never been worn before but does not have the tags attached.
Step 3: Description

After the title, you need to add a description. The more specific you are, the faster your item will sell and the least amount of questions you’ll get in the comments. Here are the things I like to add:
- Size
- Color
- Materials/Fabrics
- Details of item
- Fit/Style
- Wash instructions
- Country of origin
- Condition of the item (any flaws or defects)
Most of this you can find on the garment’s tag inside the item or by looking up the item on Google.
The image above is a screenshot of one of my listings for a pair of Free People jeans.
Step 4: Details
The next step on how to sell clothes on Poshmark is to fill in all the listing details that are automated through the app. First, you will fill in the category, quantity, size, brand, and color. You can select up to 2 colors for the listing. Then select whether it is new with tags or not.
For the category, try to be as specific as possible. First choosing from Women, Men, Kids, Home, or Pets, and then from more specific options like Dresses, Jeans, Shoes, Skirts, and more. The more accurate your listing is, the faster someone who wants the item will find it and buy it.
Step 5: Price
The last step before posting your listing is to set a price.
Fill out the original price of the item and then the discounted price you are setting. NWT items usually sell at a 50% discount off the original, and all other items at a 60% discount. These averages will vary for items that are more in-demand or rare.
If you price your item too high, it won’t sell, but if you price it too low, you won’t make any profit on it.
It’s free to list the item, but once it sells, Poshmark takes a 20% fee. For sales under $15, the fee is just a flat rate of about $3. Poshmark does handle all the shipping and labeling for you, so packaging and sending your items to their new home is super easy.
Poshmark also has the offer feature, which allows you to offer a lower price when buying an item and negotiate when selling.
The bundle feature also allows someone to buy multiple items from your Poshmark at once and save on shipping. You can also add a bundle discount feature in your settings, which gives your buyers an automatic discount when they buy more!
Step 6: Package & Ship
After accepting an offer or someone directly buys your item, you will receive an email notification that will include a pre-paid shipping label with the buyer’s address and your return address already filled out.
Poshmark offers priority 2-day shipping with USPS, so I usually ship my items in priority mail envelopes which you can get for free at your local post office. You can also use poly mailers or any other boxes or envelopes you want!
Getting a good review is very important to have more buyers and sales in the future. Take time to package your order nicely and make sure the item is washed and clean when you ship it! I like to add some tissue paper, ribbon, and a thank you note.
When the buyer receives their item, they will accept it in the app, leaving a review and rating out of 5 stars.
Then your earrings will be deposited in your account, which you can check anytime under balance in the app. You can use that balance to shop on Poshmark or use direct deposit to send it straight to your bank account.
Step 7: Share
Poshmark’s sharing feature helps you gain more sales and followers. By sharing your listing at least 3 times a day, it moves it to the top of the page, appearing in more searches.
Poshmark also has “posh parties” which are selling parties with specific categories. Sharing your items if they fit the party’s category will also help them sell faster and gain you more followers.
Step 8: Followers
Speaking of followers, gaining more on Poshmark also helps get your Posh Closet noticed and increase sales.
I gained more followers by finding accounts in the app that followed the same brands as me, had similar brands listed in their own closet as me, or were near me by location or by college. You can do all this on the app under followers and sorting by these specific categories.
I also went through and just mass followed a bunch of other accounts to gain more attraction to my closet.
Step 9: Social Media
Another great way to get more followers and sales is to connect your Poshmark to your social media accounts. Pinterest especially gives you a higher chance of making sales. When you link your Pinterest, every post you share and make goes directly to Pinterest as well.
Also, share your account on Instagram so your other friends can find cute and affordable clothes to buy!
Step 10: Community

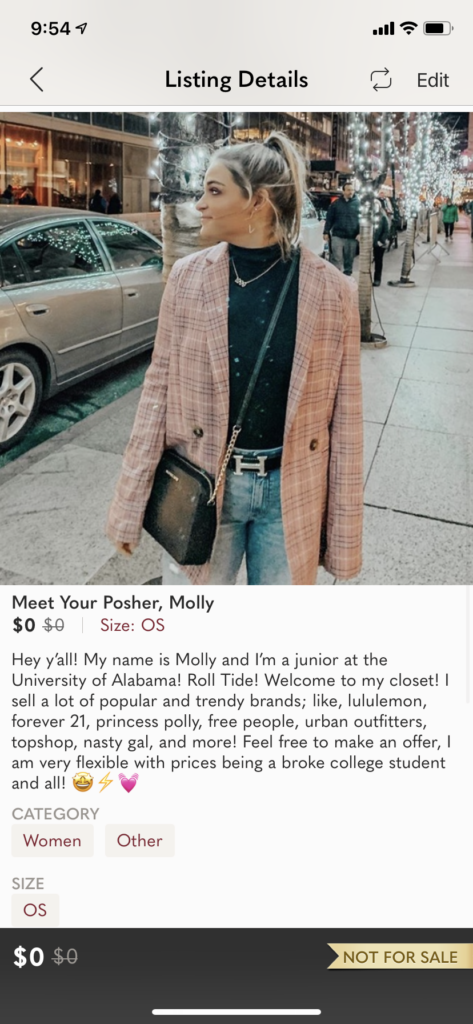
The awesome thing about Poshmark is it’s not just an app, it’s also a community. When you create your closet, don’t forget to create a “Meet Your Posher” listing. This is where you introduce yourself and tell the community a little bit about yourself!
The image above is a screenshot of my listing.
Also, like and comment on other people’s “Meet Your Posher” listings to engage and meet new people. Make sure to respond to your comments, whether they be questions about the product or other Poshers just complimenting your closet!
How excited are you to start selling on Poshmark?
Do you have some old clothes you can list? What else to do you want to know about selling clothes on Poshmark? Let me know in the comments below!
