Whether you’re a seasoned DIY pro or just want to spice up your wardrobe on the cheap, our new column DIY Chic is here to show you how to stay stylish on a college budget. If you are looking for more DIY inspiration, check out our past tutorials on creating your own button earrings or customizing your favorite class organizer. Plus, see our list of the best DIY jeans ideas, ever.
This week, I am sharing an easy sewing trick to transform your old straight-leg, wide leg, bootcut or flared jeans into skinnies. This is also a simple way to tailor your pants if they no longer fit. Skinny jeans have been in style for some time now and it doesn’t look like the sleek silhouette is going anywhere soon!
This project does require a sewing machine and basic sewing knowledge, but is a great place to start if you have been wanting to hone your sewing skills. If you don’t have a sewing machine, check to see if a friend or family member has access to one. Also, some campuses also have a student art or craft center for student use, so we recommend looking into that as well!
Table of Contents
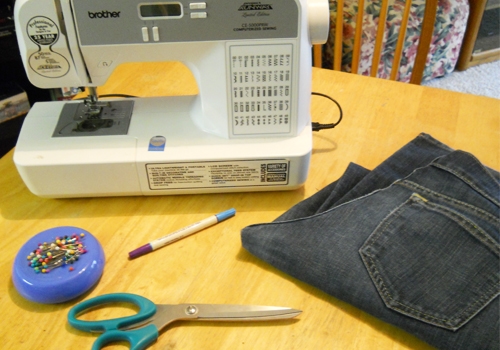
What you’ll need:
- An old pair of jeans you want to transform
- A sewing machine
- Scissors or fabric sheers
- Thread in a color that matches your jeans
- Pins
- A fabric pen, chalk, or something washable to mark the fabric with
The step-by-step process:
1. Put your old pair of jeans on inside-out. Yes, it will look and feel a little weird. But since you will be working with the inside seams, this is the easiest way to measure out the new fit.
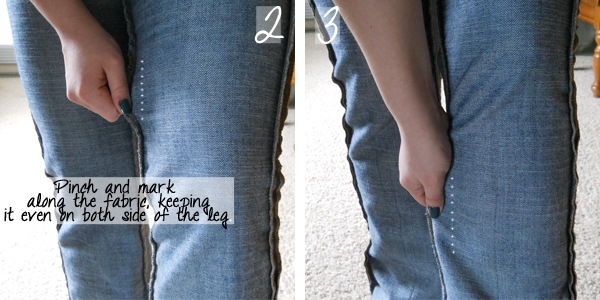
2. Starting at the inside crotch of the pant, pinch and pull the fabric to your desired fit. Take a look at the photo below to get a better idea of the process. Try to estimate how many inches of fabric you’ll want to take in.
3. Using your fabric marker or chalk, mark the fabric where you pinched. This will be where you will sew the new seam. Continuing this process, work your way down the inside leg of your jeans.Repeat on the inside of the opposite leg. Be careful to allow a little extra room in the knees and calves of the jeans – too tight, and you won’t be able to get them on and off.
4. If you want to get fancy, you can repeat these steps on the outside seams as well – this will make for more work, but can also create a more finished, uniform appearance. If you do decide to start pinching the outside seams too, make sure to take the lines you’ve already made into account so your jeans won’t be too tight. Also, if you do the outside seams, it might be necessary to taper the seam slightly at the pocket to avoid an awkward bump. See photo 4 below for a better idea of this step.
5. Before you start sewing, you might want to pin the layers of fabric together for better control.
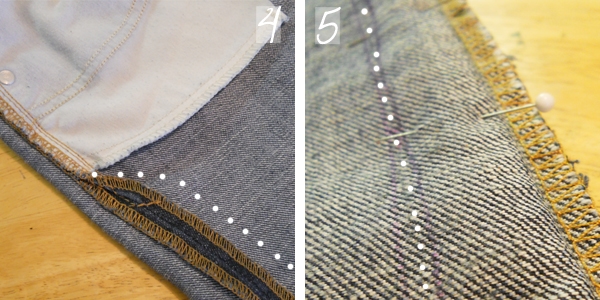
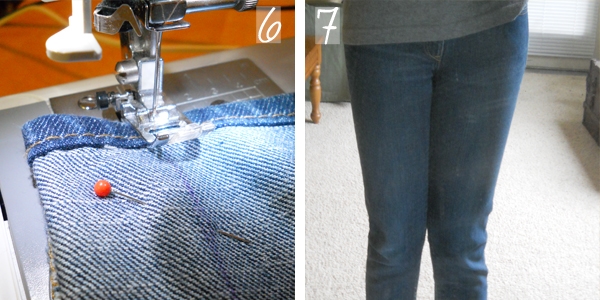
6. Starting with the insides of the legs, use your machine to carefully sew down the lines/marks you made on the inside of your jeans. (If you’re doing the outside seams too, continue along the outside of the legs as well.) When you’re finished, try on your jeans to make sure the fit is right. You might need to rip out the seams you’ve sewn – don’t be afraid to try again!
7. When you are satisfied with the fit, trim the excess fabric and old seams away – leave about 1/4 to 1/2 inch of extra fabric. Zig-zag stitch the unfinished seams for a polished finish and to help prevent fraying.
And there you have it! A simple and relatively easy technique for transforming an older pair of jeans into something fresh. It’s a great way to recycle an older pair of pants that you don’t wear much anymore.
What do you think?
What do you think of this sewing trick? Do you have a favorite way to recycle or update old pieces of clothing you no longer wear? What other types of DIYs would you like to see next? Let us know in a comment!

I have not tried this but.. It would seem to me that this method destroys the lay of the jean. The jean no longer lies on the grain and it may twist. I would take them it on both the inside and outside seam.